
Scraps to Story: Collages You’ll Actually Display
If you have trip scraps—tickets, stickers, postcards, and little “I can’t throw this away” pieces—this episode is for you. I’m sharing a simple method to turn those artifacts into a framed collage you’ll actually display, plus how to use a shadow box collage to remember someone you love in a way that feels meaningful (not overwhelming).
Creativity loves constraints—and this is one of my favorite ways to prove it.
What we cover
Why collages are a low-pressure way to keep the story
My Japan “trip scraps” collage (and how I chose the hero piece)
How a frame size becomes your constraint (and your freedom)
When to use a shadow box instead of a flat frame
A simple approach to memorial collages (portrait as the hero + a few meaningful artifacts)
The simple collage recipe
If you want a collage that feels intentional (not messy), use this formula:
Choose your constraint
Pick one container: a frame size (like 16×20) or a shadow box.Sort scraps into two piles
Story pieces: items that actually tell the story
Recycle pieces: duplicates / guilt-keepers / things you don’t really care about now
Build the background first
Start with your biggest pieces near edges/corners.Pick a “hero piece”
Choose one item your eye goes to first (postcard, portrait, map, etc.). Place it first so the rest can support it.Add supporting details
Layer smaller items + stickers + notes. Save dimensional pieces for last.Optional: add one tiny line of context
A single sentence is enough: “Japan, fall 2024” or “The best part was ___.”
Frame + mat tip (to make it feel like art)
Adding a mat creates breathing room and makes the collage look finished and intentional. You can find mats at craft stores like Michael’s.
When to use a shadow box
Use a shadow box when you have more three-dimensional items—pins, matchboxes, small artifacts, thicker keepsakes. It lets you pin or place objects without flattening them.
Memorial tip: keep it simple. Let the portrait be the hero, then add just a few meaningful supporting pieces for context.
Photos from this episode
I added photos of the collage process + the finished framed collage and shadow boxes below (including a few behind-the-scenes steps).

Try this (tiny next step)
Choose one bag of scraps—one trip, one event, one season—anything. Label it. Pick one frame you already own. Choose one hero piece. That’s it. You don’t have to finish today—just give the story a home.
-
If you have trip scraps, ticket stickers and little, I can't throw this away, pieces sitting in a bag somewhere. This episode is for you. I'm sharing a simple way to turn those scraps into a collage you'll actually wanna display. Plus how to use a shadow box collage to remember someone you love in a way that feels meaningful and not overwhelming.
Why Collaging is Meaningful
Today we're talking about one of my favorite low pressure ways to keep the story: collages. I love collaging because it feels like I'm putting together a puzzle. You are taking all these little pieces that mean something, tickets, stickers, notes, tiny artifacts, and you get to decide what the finished story looks like.
It's creative, it's tangible, and honestly it's hard to mess up. I wanna share a few approaches you can use depending on what you're working with. Flat paper scraps, bigger objects, or even collaging as a way to remember someone.
Starting Your Collage Project
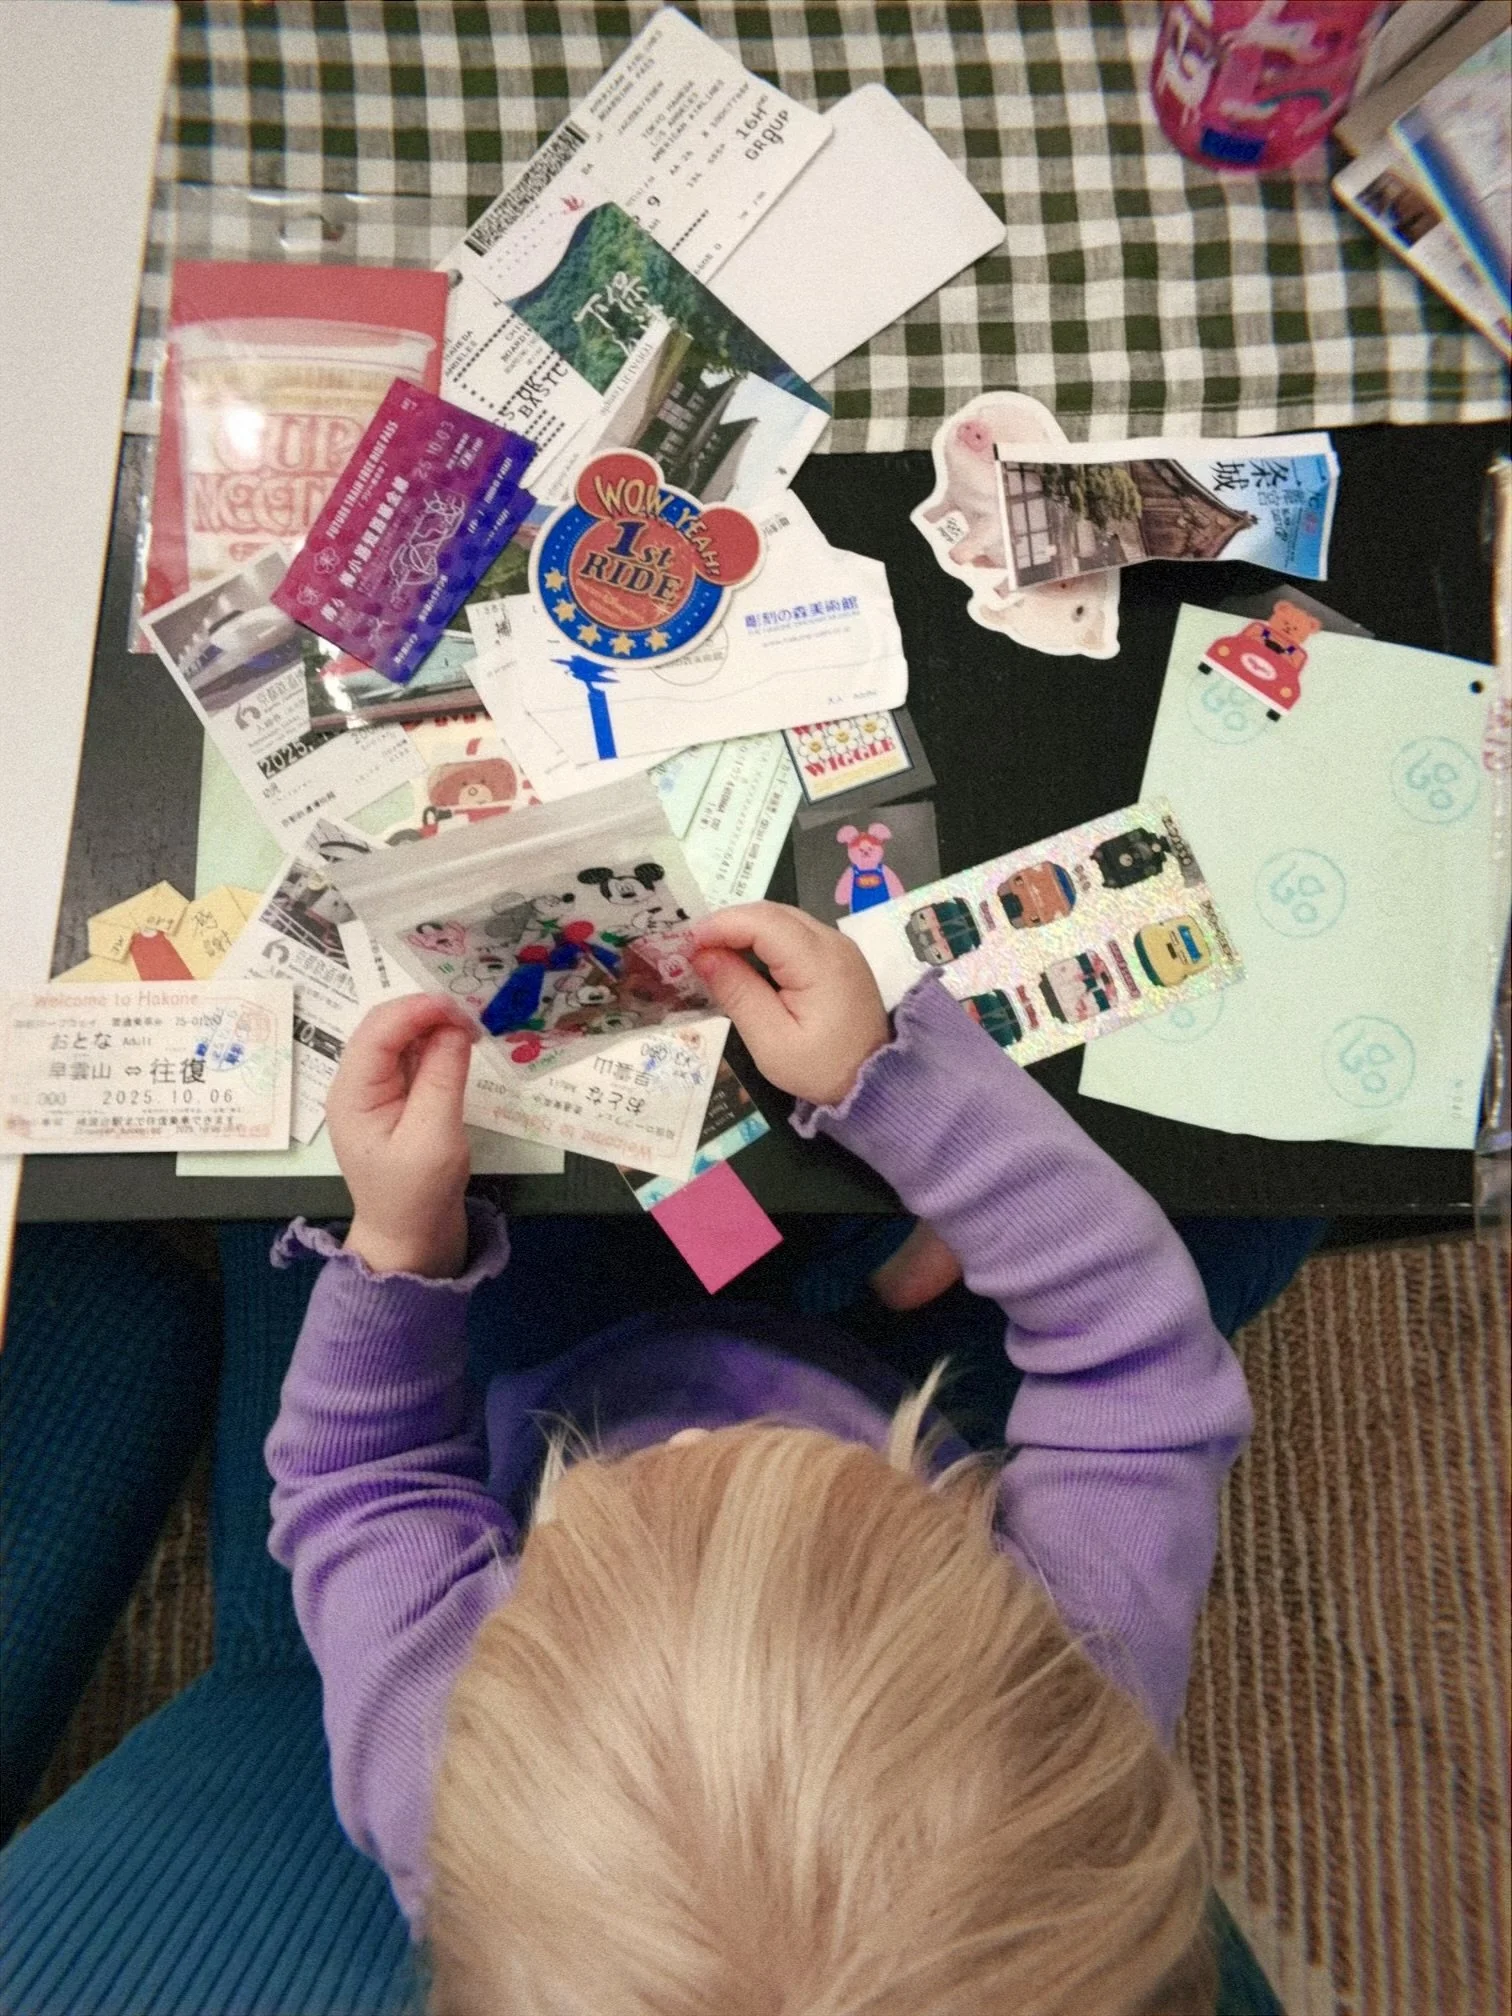
Over the weekend I finally did something I've been meaning to do since our trip to Japan last fall, we had all these little pieces from the trip tickets, paper stickers, and one thing I loved is that in Japan, people would randomly give my daughter little origami pieces or stickers. It was so sweet, and we ended up with this small collection of trip artifacts that I didn't want to lose.
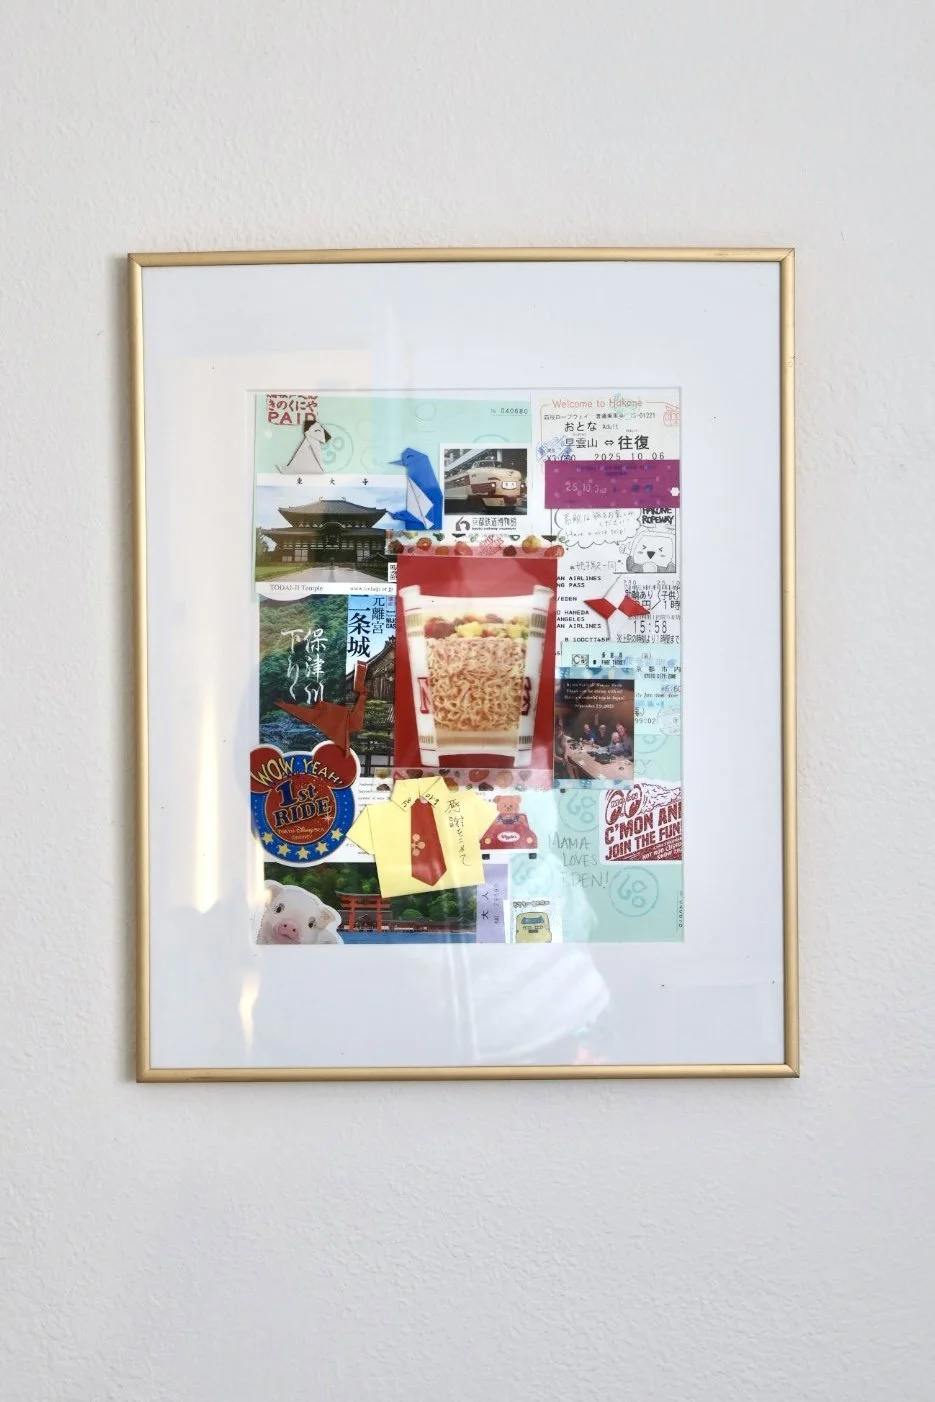
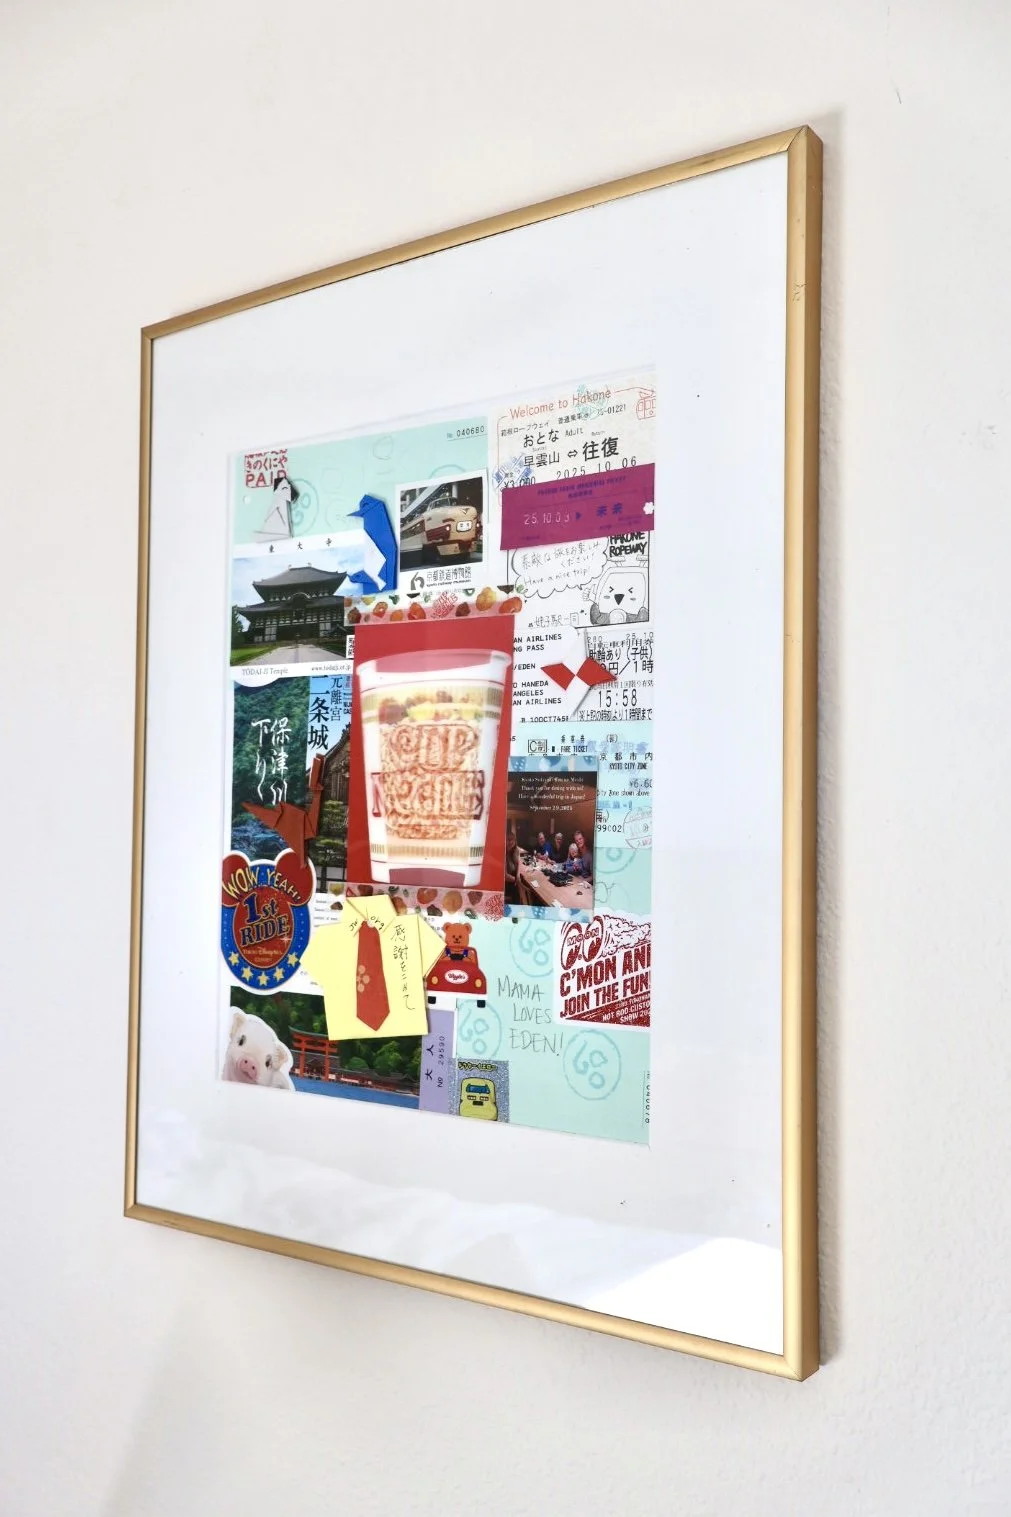
When we got home, I put all of it into a bag for safekeeping and set it aside knowing that I did not have the capacity to do something with it then. And then the key was when I was ready, like this last weekend, I gave myself a container for the project. We already had a 16 by 20 frame we weren't using. So I decided, great, this collage will live inside that frame. That decision immediately made it easier because now I'm not asking how big should this be? Where should this go? The frame tells me the boundary, and this is where one of my favorite quotes comes in. Creativity loves constraints.
I found that to be so true with design, but also with memory keeping. When you give yourself a boundary, like choosing one frame size, deciding this is a shadow box project, or making a quick call on what stays and what goes, it actually makes the creative part easier. The constraint becomes the freedom.
Designing Your Collage
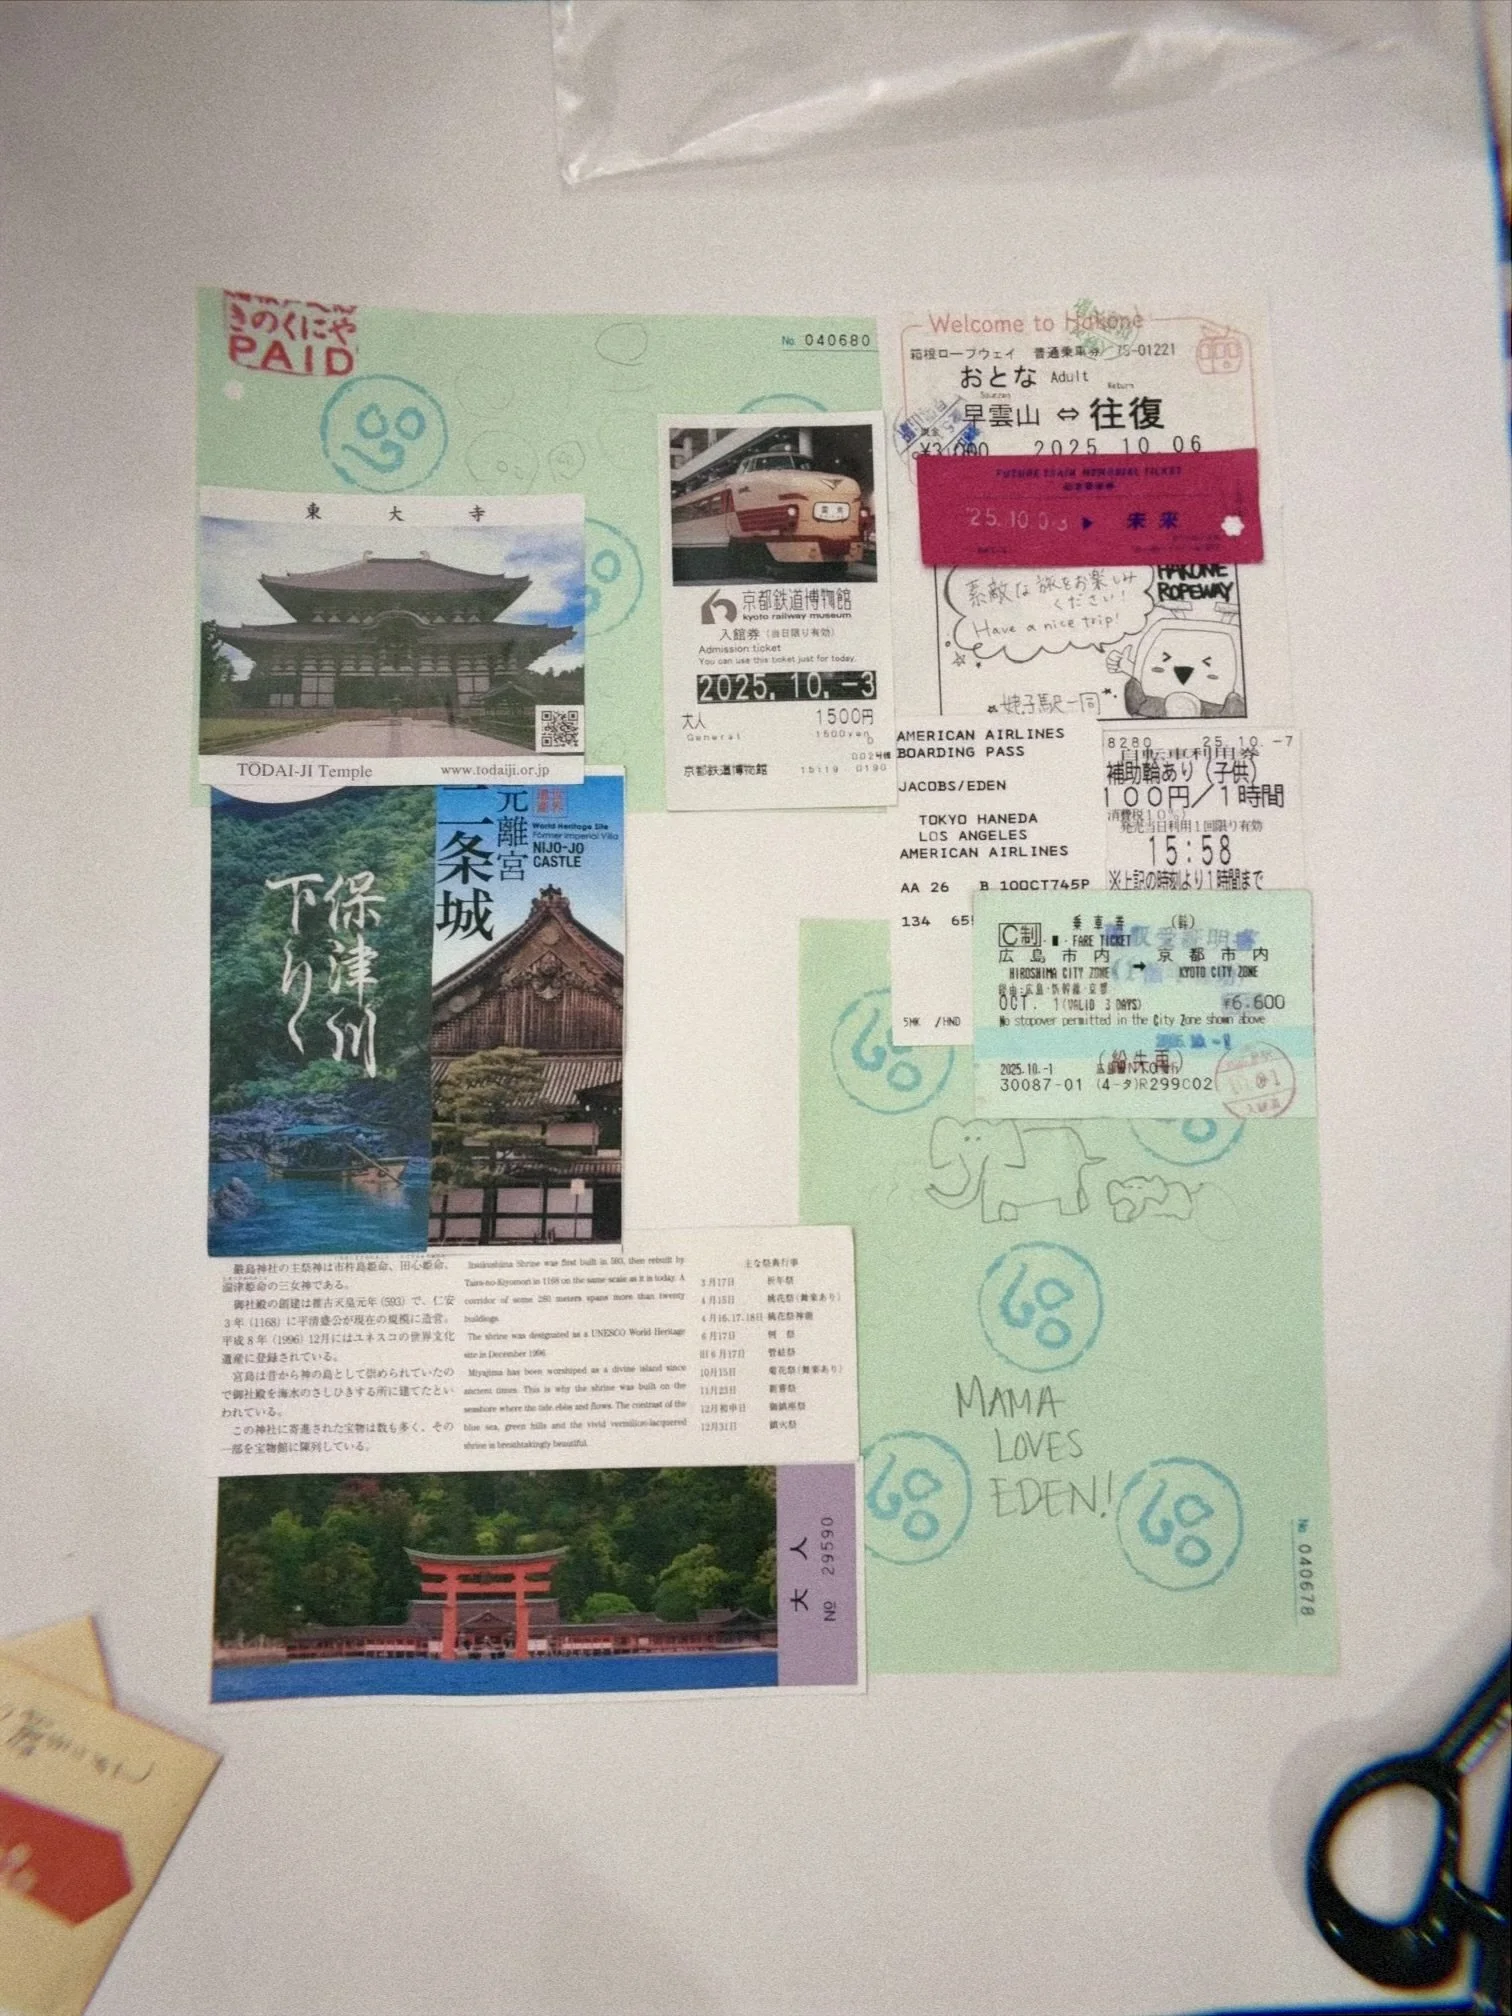
For the background, I used white poster board style paper and cut it to fit, and then I added something that made it feel more like an art piece, a mat. I learned you can buy mats at craft stores like Michael's, and it creates this clean border that makes the collage feel intentional, not messy. It also gives the collage room to breathe.
One design note. I wanted the collage to feel like it bled to the edge of the mat, meaning there isn't any. Inner white border inside the mat. So I planned my layout, knowing where the mat would cover the edges, and I built the collage outward to feel full.
Here's the method that worked really well. First, I sorted my scraps into two piles, the story pieces, things that actually tell the story of the trip, and then the recycle pieces, things I was keeping out of guilt, not meaning. Also, because it had been a few months, I felt like I could more accurately discern what was something I really wanted to keep and what I just didn't really care about keeping anymore. Any duplicate tickets and things like that that I didn't really need copies of to create the story I wanted to create with the collage. Then I started with the biggest pieces, first papers, larger tickets, and placed them towards the corners and edges to create the background.
I tried not to overlap too much because I still wanted the main pieces to be visible. Think of it like layering without burying the story.
Creating a Hero Piece
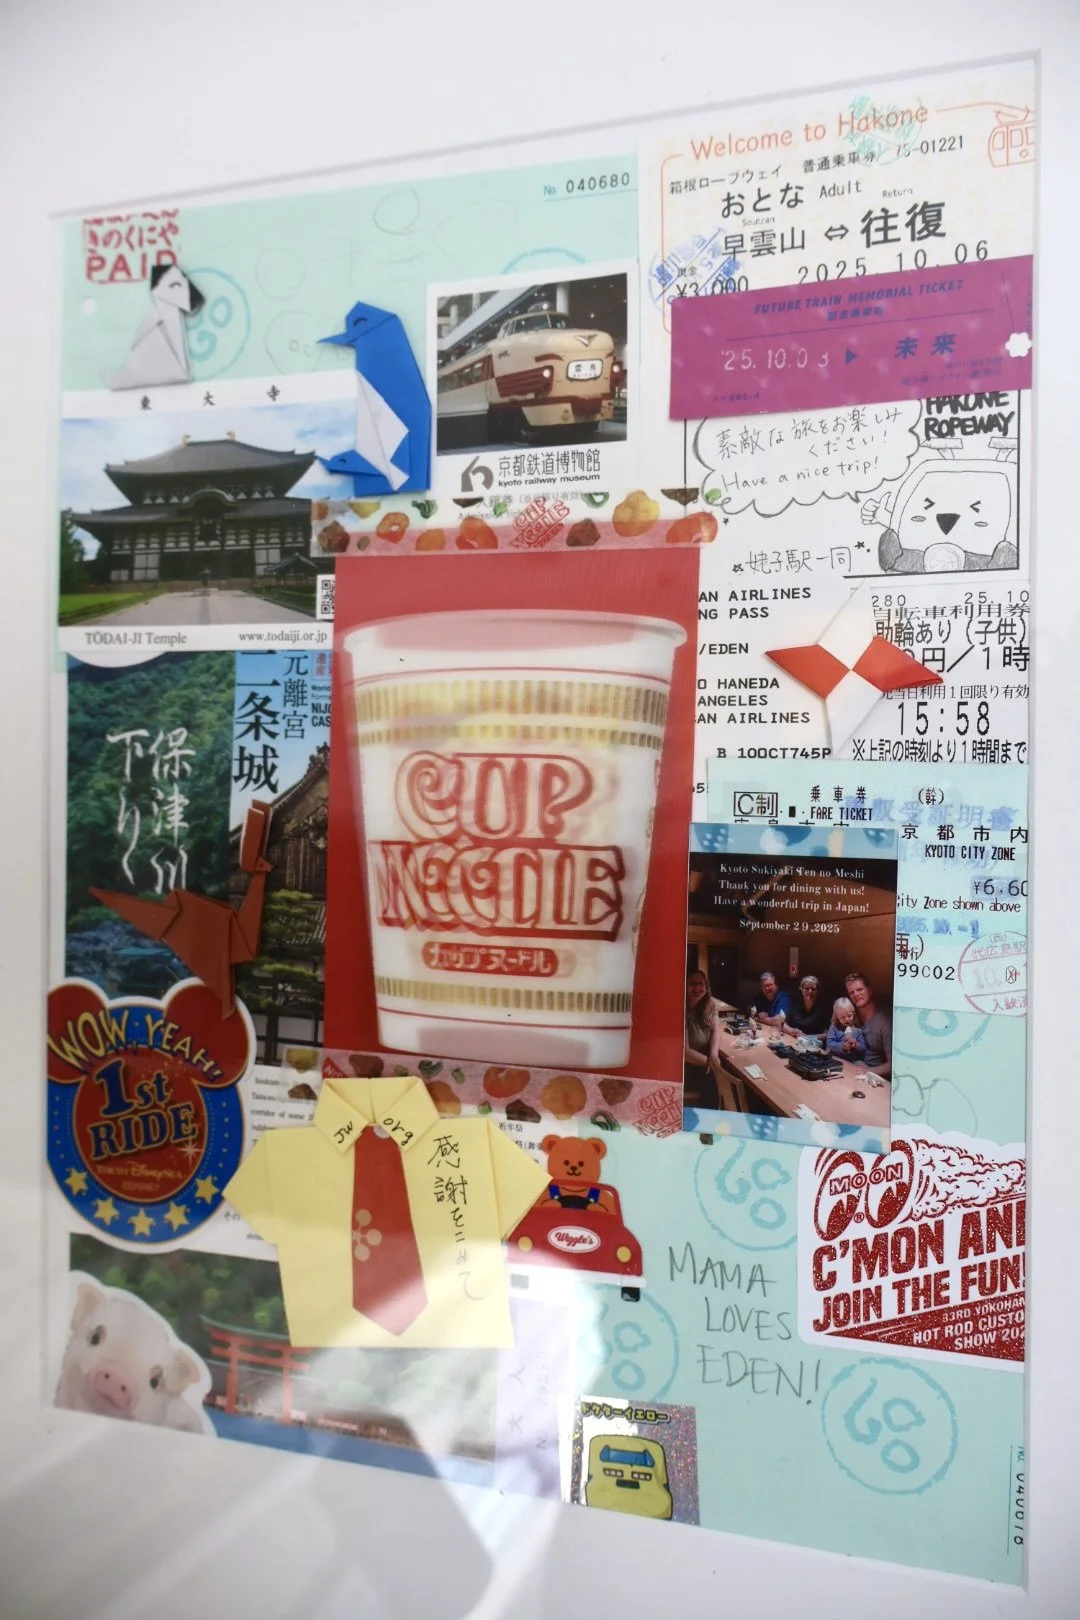
Next, I chose what I call the hero piece. The thing your eye should go to first. For mine, it was this postcard from the Cup Noodles Museum. It's one of those postcards where you see two different images depending on how you tilt it.
It's playful, bold, has this red background, and immediately pulls your eye in. I place that hero piece in the center because one of the most helpful design principles, whether you're a designer or not, is decide where you want the eye to go first. If you don't decide, the collage can feel a bit more chaotic if you do decide everything supports the story.
Finishing Touches
Then I glued down the larger background pieces and let my daughter help with placing the stickers. She loved it and it made it feel like a shared memory making moment, not just my own project. Finally, I added the origami pieces last. They're more dimensional, so placing them at the end helps me balance the layout without flattening everything too early.
I love how this turned out. I felt like I let myself have fun with it, and now it's in our dining room and. Those pieces aren't in a bag anymore, and we can really see it. I'm excited for it to be a quiet conversation starter, both for friends and for us to look at and remember all these little details that have the dates on them.
It's just part of our home now and part of our story.
Using Shadow Boxes
Now, if you do have bigger, more three dimensional object, a flat frame can be limiting. That's where a shadow box is amazing because it gives you some depth. You can pin or place objects that wouldn't sit flat in a regular frame.
One of my favorite shadow box pieces that we've had for years isn't exactly a collage, but it's the same idea. Taking something meaningful but sometimes hidden and making it visible. When my now husband and I were dating, we did part of a Route 66 trip and stopped at Cadillac Ranch in Texas. The place with the old Cadillac sticking up from the ground where people spray paint messages.
If you haven't seen it or been there, look it up. It's really interesting. But right before we went, I found out a friend had passed away and we ended up spray painting a little message for her and on one of the cars, there was this thick, layered wad of spray paint built up, and my husband broke off a piece and kept it, it's probably about three inches thick.
It's must be years of spray paint. And it lived in a plastic bag for a long time, even after we got married. At some point I was like, if we're gonna keep this, let's display it like it matters. So I put it in a shadow box, and once it was framed, it felt like it became art. It became a memory, it became a story we could see, and that's one of the big things I love about collaging and frames.
It takes something that's random and turns it into something much more intentional.
Personal and Memorial Collages
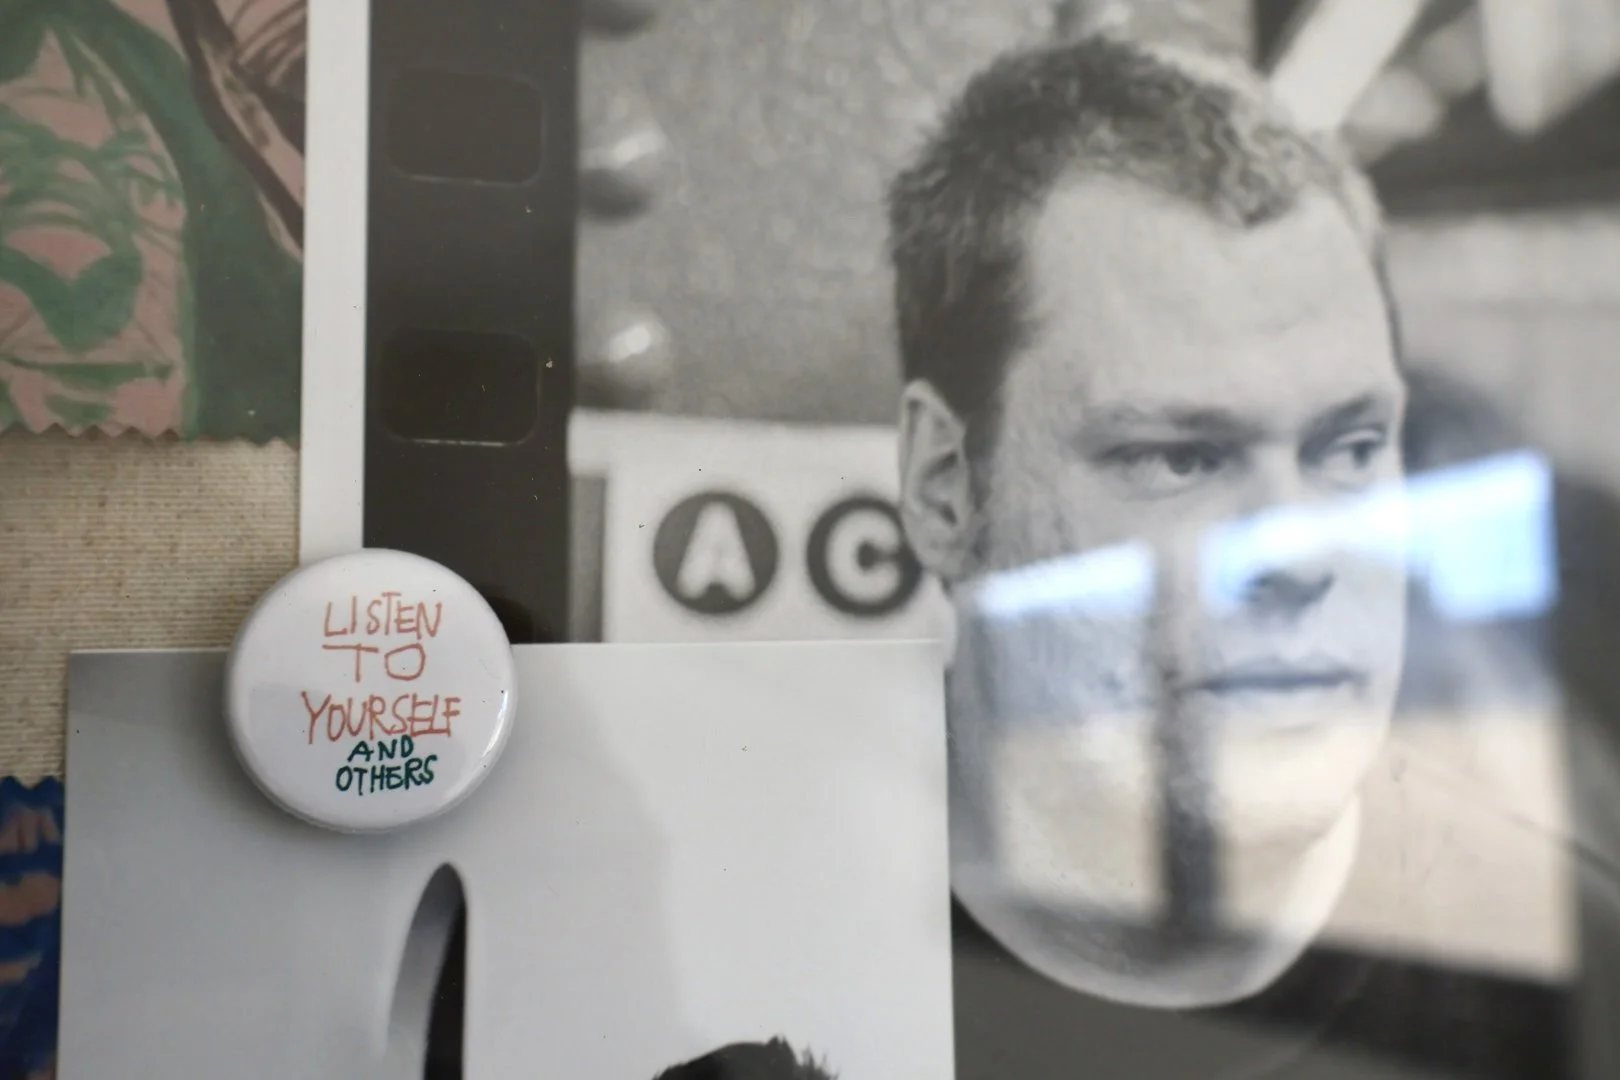
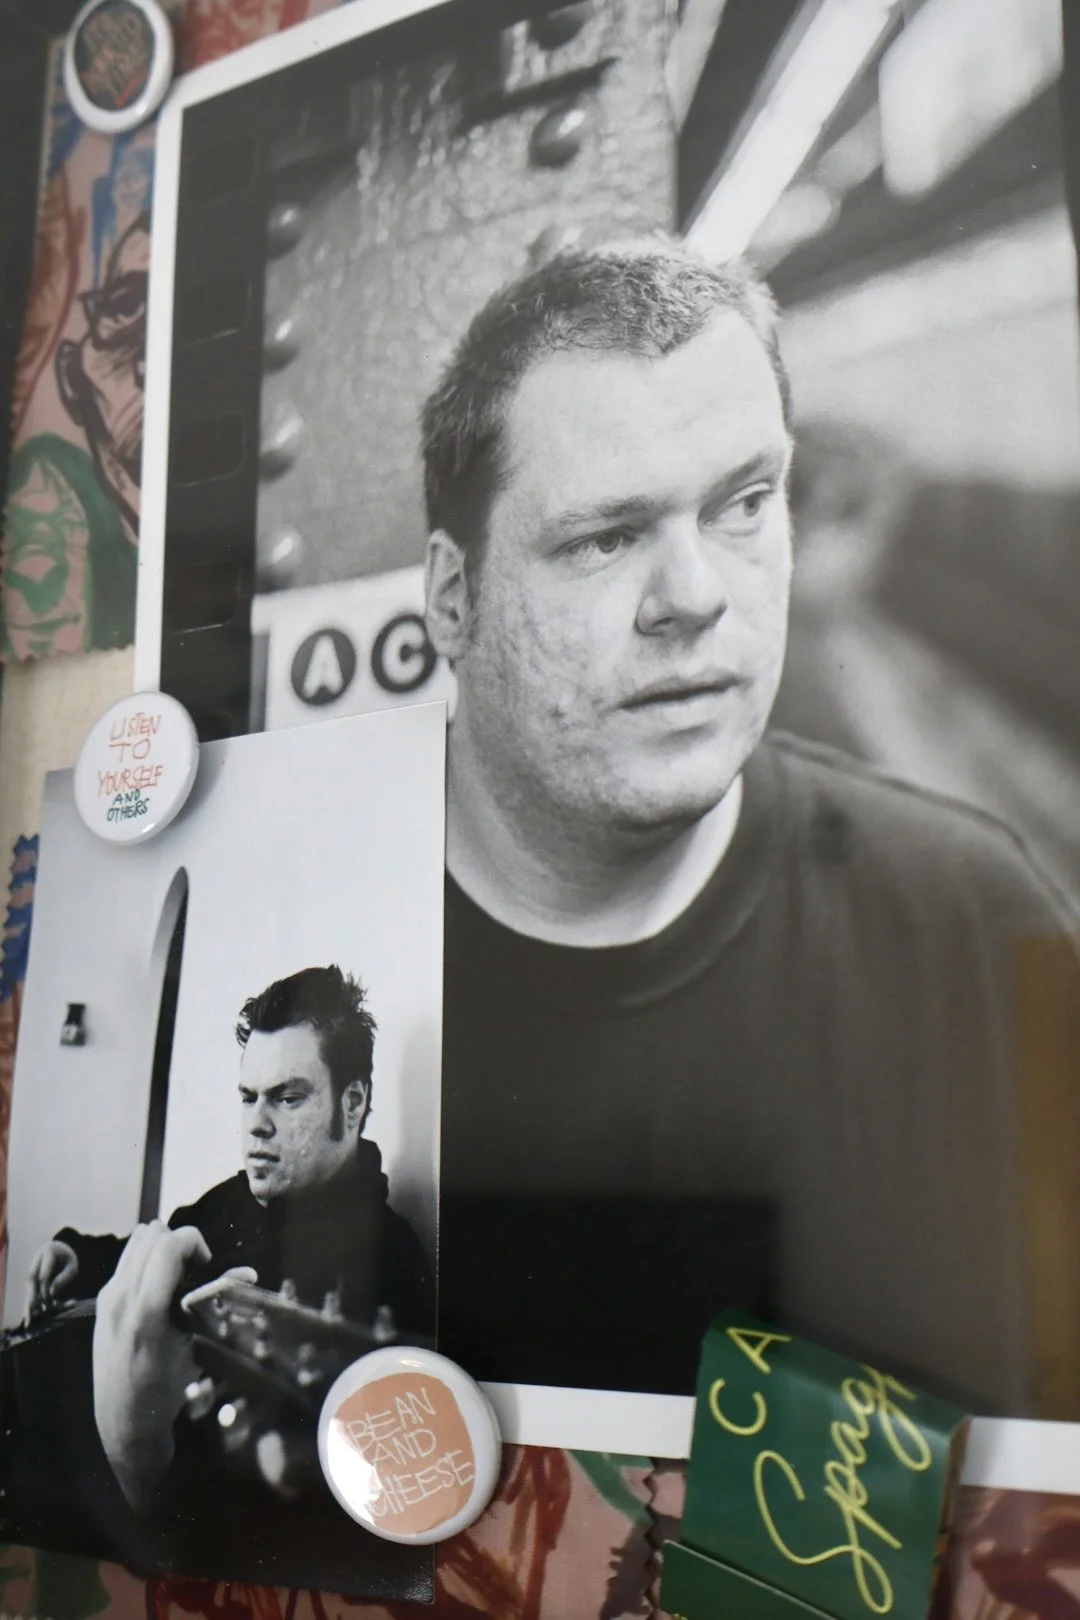
Another collage I made recently was even more personal. My husband's uncle passed away and one of the uncle's friends sent a beautiful black and white eight by 10 portrait of Uncle Rich. From the Memorial Services my husband had a few artifacts of Uncle Rich, some pins, and a matchbox of his favorite restaurant. He also had a few photos and a poem that he had written. I didn't want these items to get lost, damaged, or, just laying around somewhere. So I made a shadow box collage to honor him.
And the goal for this was not to overdo it. I wanted the portrait to be the main focus. And then I wanted a few supporting elements around it that gave context, little reminders of his personality, his creativity, the things he loved. He was a really cool artist and I placed some of his artwork on the background of the shadow box, and then I placed the portrait as the hero and later second photo in front of it and the bottom left. And then I added the physical objects around it, pinned them in so it felt curated but not crowded.
I love part of collages because of the nature of them. I feel like they can be pretty dynamic and forgiving if you forget something or you wanna add something later. And so for Rich, we wanna add a poem that he wrote and we're trying to track down, the specific font for it before we put it in. But it's really easy to rearrange and add things, especially because the shadow box used push pins instead of glue.
For the Japan collage, even then, I had missed one piece that I really wanted in there, and so I was able to add that piece back in, and it was really easy.
I realized part of creating a story around you is about creating things that remind you of the stories you're living or have recently lived. I love that these collages might not be the thing that gets passed down for generations, but that it can remind us of current memories and stories that we want to highlight and talk about. They can be places in our home where I can look up remember someone honor someone and keep a piece of their story close.
Final Thoughts and Encouragement
One more thought before I close, because this ties back to what I talked about in the last episode. Start where you are. I love with collaging, you just start putting pieces down and seeing how things work together and creating this dynamic art piece with what you have, and I was thinking about this too, of just starting where you are and celebrating what you're doing and my daughter, she's been recently telling me excited for herself that she did not call me a poo poo head. Every time she says it, I'm like, was this something you were working on? Was this a goal? But honestly, it's kind of sweet because she is so proud of herself and she's noticing this win.
And I want that for you too. Whatever you're working on, whether it's Habits, health, showing up better, being more present, celebrate those small wins, even if it feels silly.
I am celebrating those small choices and collaging can be the same.
You don't have to do the perfect memory system. You can just take what you already have and give it a place to live. If you want a tiny starting point, try this. Choose one bag of scraps, one trip, one event or one season. Put it in an envelope or a zip bag and label it.
Then pick one frame you already own or one you know you wanna get and choose one hero piece you wanna build around. That's it. You don't have to finish today. Just give the story a home. When you're ready to look back on that memory and start building this collage you'll have it ready for you.
If you try a collage or shadow box, I'd love to hear what you include. And if you can send a picture, I would love to see it.
If you wanna see photos of the collage process and how it turned out, I did add them to the show notes . Until next time, make the memories, keep the story letters from today for the days ahead.